
One Room Challenge Week 4: Oscar the Grout | New Backsplash and Wall Tile!
- peonyandhoney
- Oct 20, 2021
- 7 min read

Hi, my honeys! Welcome to week 4 of the One Room Challenge and probably one of the more dramatic reveals so far! It's TILE WEEK! I can't believe we are halfway through the Fall ORC, and boy, has our kitchen made some serious progress. I'm not gonna lie, it was touch and go there for a minute. Between drywall repairs needing to be made, contractors ghosting us, our main water line accidentally being cut into by a contractor--it's been a doozy! It has been hard for me to picture our kitchen looking amazing up until this point, but let me tell you the tile made all the difference!
We had our backsplash removed and replaced with new tile from my amazing sponsor Tile Bar, and we decided to carry the tile up the walls, over the patio door, and behind our floating shelves above the breakfast bar! Aside from the countertops, this was a big pain point in our kitchen that we have wanted to take care of for awhile! Ever since moving in to our home in 2015, my husband and I always hated our backsplash. It was very busy with different shades of brown ceramic sheet tiles that didn't seem to fit the style of the home at all.
Here's what the backsplash looked like when we moved in:

Super busy, right?! Well, I thought of a great temporary solution a couple years ago, which I'd like to share with you in case you don't quite have the budget or aren't ready to take on your kitchen renovation yet. We painted our backsplash tile! Yep, didn't know it was possible until I got sick of looking at our busy backsplash and found some tutorials! I used 3 coats of wall primer and 2 coats of Wise Owl One Hour Enamel paint in the color Snow Owl to paint our old tiles white. It turned out quite similar to a real ceramic tile finish, and if you follow that painting guide and you use a mini roller, I promise your ceramic tile can be painted over and look nice! It actually held up quite well, too, and it was very easy to wipe off!
Here's how the kitchen looked with the white tiles:

Now, that I've brought you up to speed on our previous kitchen iterations, it's time for some new tile! Years ago, I had my heart set on plain white subway tile with dark grout, but wow, my style has evolved quite a bit from then. A lot of people will say subway tile is played out, but I think really it's just the plain white subway tile with dark grout that gets a bad rap. There are many lengths, textures, and colors of subway tiles now that make a space look unique and fresh! I was definitely considering some type of subway tiles as a possibility for sure.
My advice for choosing tiles is to gather some inspo from Pinterest and order some tile samples you might be interested in! Tile Bar offers 5 tile samples for only $5 with free shipping! It's great to be able to compare the tiles in person! I also love that their website has a "view in my room" feature that lets you apply the tile to a photo of space in your home! They also feature different tile projects sent in by homeowners on the Tile Bar Instagram page, so you can see what the tile looks like in various homes! I highly suggest you stalk all these pages to get a clearer picture about how the tile will look in your home.

Inspo via @Jaci.Daily

Inspo via @amberinteriors
Measuring for tile is pretty straight forward. You just want to measure your backsplash and/or walls in my case in rectangular sections in inches, and then add all of them up together. Divide by 12 to get your square footage. When ordering tile, you want to add on an extra 15% in square feet as an overage. The overage is a safe guard for any damaged tiles or tiles measured or cut incorrectly when installing. Don't play yourself, and just order the extra 15% square footage of tile. LOL!
For my Calm Chateau kitchen reno, I knew I wanted a handmade look to the tile. I was looking for something that gave cottage vibes, and after much Pinteresting, I found Zellige tiles. They're handmade clay tiles that have a truly unique look to them, and no two tiles are exactly alike. There's a lot of color variation in Zellige tiles, and you can get them in a subway shapes and 4x4 squares. The only problem was the price! Most of the Zellige tiles I found were priced at roughly $16-$18 a square foot, which I just couldn't rationalize that hefty price tag.

In my search for tiles, I came across Tile Bar's Montauk Gin 4x4 tiles, which are white with a beautiful sheen to them. You also get the illusion of a color variation because some of the tiles have more or less sheen to them and different textures. You really get that handmade look and feel on a serious budget. These tiles are priced at only $6.95 a square foot! You get the authentic Zellige tile look for a fraction of the price. Tile Bar was kind enough to gift me the 89 square feet of this amazing tile for my space, but gifted or not, this was always the tile I was going to choose. It is so stunning in person, and the natural variation in texture and sheen really make them special!

Installing the tile would be a somewhat tricky job since we wanted it carried up the walls, and we have things to work around like our floating shelves. My husband and I have never installed tile before, so we both agreed this would be one project we would hire a professional to complete. Only problem was, tile guys are apparently in high demand these days! I actually got ghosted by 2 different tile guys before I found our 2-man tile crew. They typically only do corporate jobs only, but I have a friend who knows the one guy's daughter, so they made and exception to do my residential tile job!
Honestly, it was actually super cool to watch the way our tile installers worked! They installed the tiles in tandem with each other. One would do the measuring and cutting while the other applied the mortar to the wall and placed the tiles. It was so impressive to see how much of a well-oiled machine they were. And let's keep it 100, if my husband and I attempted this project, we'd probably still be at it as we speak lol! We opted to stagger the square tiles like you would install subway tiles instead of putting them up in a grid pattern. We figured this would be the best choice because we had to consider the window and how there wasn't room for a ton of tile on either side of it. Placing the tiles in a staggered pattern definitely worked for around our window.

For the grout, our tile installers recommended Prism grout which you can snag at Home Depot. This grout is a bit more expensive than the other grouts on the shelf, but he assured be that this product was not only easy for them to work with but would stand the test of time--it's stain resistant, too. I chose the color Bright White, which is not their whitest white, but is also not ivory. I wanted the grout to be white but not stand out too much from the tile, and we definitely achieved that! We had one area where the tile edge would be visible, and we decided to just paint the edge of the tiles the same color as the wall color to make it look finished instead of installing a metal edge since they don't make 4x4 bullnose tiles. It actually turned out great, so I have no regrets about that choice.

Our tile installers also helped us out with what to do about our existing floating shelves. Initially, I thought they would just tile around our shelves as they hung on the wall, but my tilers assured me that the better option would be to remove all of the shelves and brackets and tile the whole wall, leaving only small squares with X's marked on them for the location of the studs. When we went to re-install our floating shelves after the tile installation, we were able to easily screw into the studs to secure our shelf brackets. Pro tip: talk to your tile installers about details like this ahead of time, so you know what you're getting and you can solve any tricky problems that might come up. You can always get a diamond bit for your drill if you decide to get shelves after tiling, but there's a chance you can still crack the tile when installing the brackets. Make sure you're always advocating for yourself and your home, especially when it comes to very important installs in the space like your tile. If you don't like the tile placement on the wall, say something right away so you can be sure to get what you want.
To give you an idea on pricing, 89 square feet of Tile Bar's Montauk 4x4 tiles would be $635. With that amount of tile, we were able to cover our entire backsplash, above the window, above the patio sliders, and our entire breakfast bar wall. We paid $30 for grout, and $1000 for the install. If you have similar square footage of wall space for your tile, you can expect to pay a total of around $1,600-$1800, depending on how much your tiler charges you. I personally think $1000-$1200 is a fair price for roughly that amount of tile installed.
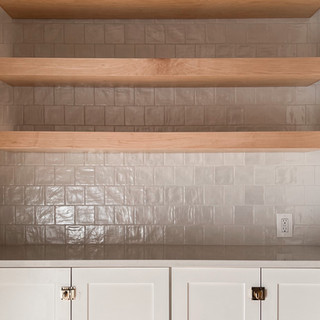
Without further ado, let me give y'all a big ole' looksie at our new Montauk Gin 4x4 tiles from Tile Bar installed on our breakfast bar area! We absolutely love how it came out, and the staggered placement, soft white grout we chose, and the 4x4 shape of the tiles really hit the nail on the head for what we were hoping to achieve with the overall look for our kitchen!


I want to thank Tile Bar again for sponsoring this portion of my One Room Challenge makeover, and I hope y'all are starting to see this vision come to life! Don't forget to stop by my Instagram for more One Room Challenge content, and make sure you're subscribed to my blog here, so you don't miss the big reveal in just four weeks!
My ORC Sponsors:
Calico | Crystorama | Kelly Moore Paint | Loloi | Minted | Parker Gwen | MR Direct | Tile Bar |


Dunia balap Indonesia juga mendapat perhatian melalui ajang ARRC. persebaya vs persija 2000 bonek hadir dukung timnya
What an inspiring reveal! Attention to detail truly makes all the difference — just like how Kwik Kar Auto Dallas, a professional and expert auto repair shop, focuses on precision in every wheel alignment service, engine tune up service, and transmission fluid change. Their authentic and affordable car repair services also include oil change and state inspection near me, vehicle differential services, and engine diagnostics. If you’re in Dallas looking for the best specialists in car DOT inspection and maintenance, Kwik Kar Auto Dallas is the trusted choice for quality and reliability.
Topdewa | Topdewa | Topdewa | Topdewa | Topdewa | Topdewa | Topdewa | Topdewa | Topdewa | Topdewa | Topdewa | Topdewa | Topdewa | Topdewa | Topdewa | Topdewa | Topdewa | Topdewa | Topdewa | Topdewa | Topdewa | Topdewa | Topdewa | Topdewa | Topdewa | Topdewa | Topdewa | Topdewa | Topdewa | Topdewa | Topdewa | Topdewa | Topdewa | Topdewa | Topdewa | Topdewa | Topdewa | Topdewa | Topdewa | Topdewa | Topdewa | Topdewa | Topdewa | Topdewa | Topdewa | Topdewa | Topdewa | Topdewa | Topdewa | Topdewa | Topdewa | Topdewa | Topdewa | Topdewa | Topdewa | Topdewa | Topdewa | Topdewa | Topdewa | Topdewa | Topdewa | Topdewa | Topdewa | Topdewa | Topdewa | Topdewa | Topdewa | Topdewa | Topdewa | Topdewa | Topdewa | Topdewa |
topdewa
link topdewa
link alternatif topdewa
login topdewa
daftar topdewa
slot gacor
slot online
slot 4d
slot terpercaya
toto slot
toto togel
toto 4d
Klikdewa
Link Klikdewa
Klikdewa Login
Klikdewa daftar
Toto Slot
Toto 4D
Toto togel
Situs toto
Situs slot
Slot toto
Slot online
Slot gacor
Slot terpercaya
Slot mahjong
Line5d
Link line5d
line5d Login
line5d daftar
Toto Slot
Toto 4D
Toto togel
Situs toto
Situs slot
Slot toto
Slot online
Slot gacor
Slot terpercaya
Slot mahjong